Flutter简易动画教程指南

英文地址:Animations in Flutter - easy guide - tutorial

origin

动画三大支柱 (The 3 pillars of an Animation

为了实现一个动画,需要存在下面三个元素:

  1. 一个Ticker
  2. 一个Animation
  3. 一个AnimaionController

下面这里先简单介绍这些元素,随后进行更详细的解释。

Ticker

简而言之,Ticker是这样一个类,以几乎固定的间隔来发送一个信号(大约每秒60次),想想你的表,每秒都在走。

在每个tick循环中,Ticker触发回调函数,持续时间从第一个tick开始算起。

所有的Ticker即使从不同的时间开始,总会是同步的。这对动画同步是很有用的。

Animation

动画其实没什么就是特定类型的值,在动画的生命周期中会发生变化。其值随动画时间可以是线性的(如1,2,3,4,5,…),也可以是复杂的(曲线)。

AnimationController

该类用户控制(开始,停止,重复…)一个动画(或多个动画)。换句话说,以一定速率(每秒值的变化速率),使得动画的值在某一个持续时间内,从下限变化到上限。

动画控制器 (AnimationController)

该类用于控制一个动画,精确地说,应该是“over a sence”一个场景。随后我们将会看到,多个不同的动画由同一控制器控制。

所以,在动画控制器这个类中,我们可以:

  • 向前,向后播放一个场景
  • 停止一个场景
  • 将场景设置为某个值
  • 定义场景的边界值(下限,上限)

下面的伪代码,展示了该勒不同的初始化参数:

1
2
3
4
5
6
7
8
9
AnimationController controller = new AnimationController(
value: // the current value of the animation, usually 0.0 (= default)
lowerBound: // the lowest value of the animation, usually 0.0 (= default)
upperBound: // the highest value of the animation, usually 1.0 (= default)
duration: // the total duration of the whole animation (scene)
vsync: // the ticker provider
debugLabel: // a label to be used to identify the controller
// during debug session
);

大多数时候,在初始化AnimationController的时候,valuelowerBoundupperBounddebugLabel不会涉及到。

如何将动画控制器绑定到Ticker?

为了能够工作,一个AnimationController需要绑定到一个Ticker上。

通常,生成一个Ticker,链接到Stateful组件的实例。

1
2
3
4
5
6
7
8
9
10
11
12
13
14
15
16
17
18
19
20
21
class _MyStateWidget extends State<MyStateWidget>
with SingleTickerProviderStateMixin {
AnimationController _controller;

@override
void initState(){
super.initState();
_controller = new AnimationController(
duration: const Duration(milliseconds: 1000),
vsync: this,
);
}

@override
void dispose(){
_controller.dispose();
super.dispose();
}

...
}
  • 第2行,你告诉Flutter你想要一个新的Ticker,链接到MyStateWidget实例上。
  • 第8-10行,初始化控制器,场景总的持续时间设置为1000毫秒,并绑定到Ticker上(vsync:this)。隐式参数:lowerBound=0.0upperBound=1.0
  • 第16行,这是非常重要的,在MyStateWidget组件被销毁的时候,释放这个控制器。

TickerProviderStateMixin 还是 SingleTickerProviderStateMixin?

如果你有多个AnimationController实例,并且你想有不同的Ticker,使用TickerProviderStateMixin替换SingleTickerProviderstateMixin

控制器已经绑定到Ticker上,但是这有什么作用呢?

多亏了ticker,每秒钟大约60次tick循环,AnimationController在给定的持续时间内,线性地从下限到上限产生值。

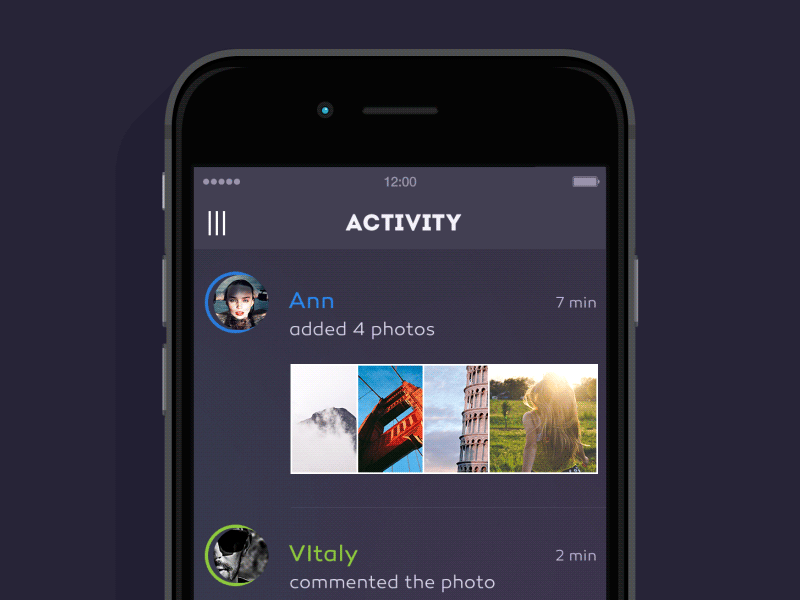
例如下图,在1000毫秒内产生了这些值:

我们看到,这些值在1000毫秒内从0.0(下限)变化到1.0(上限),产生了51个不同的值。

让我们展开看看代码,是如何使用的:

1
2
3
4
5
6
7
8
9
10
11
12
13
14
15
16
17
18
19
20
21
22
23
24
25
26
27
28
29
30
31
32
33
34
35
class _MyStateWidget extends State<MyStateWidget>
with SingleTickerProviderStateMixin {
AnimationController _controller;

@override
void initState(){
super.initState();
_controller = new AnimationController(
duration: const Duration(milliseconds: 1000),
vsync: this,
);
_controller.addListener((){
setState((){});
});
_controller.forward();
}

@override
void dispose(){
_controller.dispose();
super.dispose();
}

@override
Widget build(BuildContext context){
final int percent = (_controller.value * 100.0).round();
return new Scaffold(
body: new Container(
child: new Center(
child: new Text('$percent%'),
),
),
);
}
}
  • 第12行,这一行告诉控制器,每当它的值发生变化,我们需要重新构建这个组件(通过setState())。
  • 第15行,一旦组件初始化完成,我们告诉控制器开始计数(forward(),从下限到上限)。
  • 第26行,我们取到控制器的值(_controller.value)。在这个例子中,值从0.0变化到1.00%100%),我们得到表达式百分比,显示到页面中央。

动画的概念 (The notion of Animation)

如我们所见,控制器返回一系列浮点型值,呈线性变化。

某些时候,我常常:

  • 使用其他类型的值,诸如Offsetint
  • 使用不同的值范围,而不是0.01.0
  • 考虑其他变体类型,而非线形地展示出一些效果
使用其他类型的值

为了能够使用其他类型的值,Animation类使用了模板。

换句话说,你可以这样定义:

1
2
3
Animation<int> integerVariation;
Animation<double> decimalVariation;
Animation<Offset> offsetVariation;
使用不同的值范围

某些时候,我们想要两个值之间的变体,而不是0.01.0

为了定义这个范围,我们将要使用Tween类。

为了说明这些,我们考虑这种情况,你可能想要角弧度从0变化到π/2

1
Animation<double> angleAnimation = new Tween(begin:0.0,end:pi/2)
变体类型

之前有讲过,从下限到上限的默认变化方式是线性的,这个是控制器的工作方式。
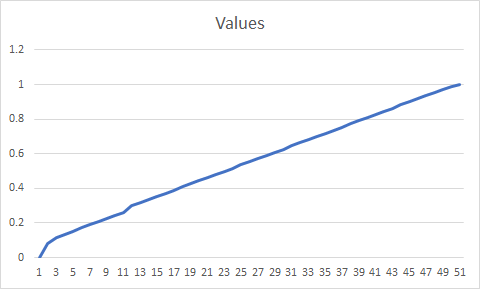
如果你想要一个角度从0变化到π/2弧度,绑定AnimationAnimationController

当你开始这个动画(通过_controller.forward()),这个angleAnimation.value将会使用_controller.value来进行插值,范围[0.0;π/2]

下面这幅图显示了线性变体(π/2 = 1.57):

使用这些变体:

1
2
3
4
5
6
Animation<double> angleAnimation = new Tween(begin: 0.0, end: pi/2).animate(
new CurvedAnimation(
parent: _controller,
curve: Curves.ease,
reverseCurve: Curves.easeOut
));

这个将会创建[0; π/2]变体:

  • 当动画从0.0 -> π/2的时候,使用Curves.ease(=forward)
  • 当动画从π/2 -> 0.0的时候,使用Curves.easeOut(=revserse)

控制动画 (Controlling the animation)

AnimationController这个类允许你通过API来控制动画(下面是最常使用的API):

  • _controller.forward({double from})

    要求控制器从下限到上限变化值,from可选参数用于控制器强制从其他值开始计数。

  • _controller.revserse({double from})

    要求控制器从上限到下限变化值,from可选参数用于控制器强制从其他值开始计数。

  • _controller.stop({bool canceled:true})

    停止运行动画。

  • _controller.reset()`

    重置动画至下限。

  • _controller.animateTo({double min,double max,Duration period})

    驱动动画从当前值变化到目标值。

  • _controller.repeat({double min,double max,Duration period})`

    按forward方向开始运行这个动画,当它完成的时候重启这个动画。

    如果定义,则min和max限制重复发生的次数。

保证安全

因为动画可能意外终止(例如,屏幕被关闭),当使用这些API的时候,可以添加.orCancel来保证安全:

1
_controller.forward().orCancel;

由于这个小技巧,在_controller被销毁前,如果Ticker被取消将不会抛出任何异常。

场景的概念

“scene”这个 词并不存在官方文档中,只是个人认为。我发现这个贴近实际,来让我解释:

正如我所说的,一个动画控制器管理一个动画。然而,我们可以理解Animation为一系列子动画,线性或堆叠地播放,这个如何链接这些子动画在一起的定义就是我所说的“scene”。

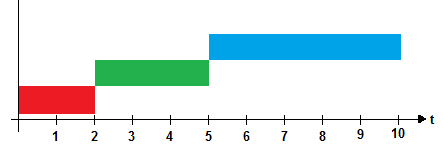
考略下面这个案例,动画整个持续时间将会是10秒,我们想要的是:

  • 前2秒,一个球从左边移动到屏幕中央
  • 然后,同是这个球,花费2秒从中心位置移动到屏幕上方中心位置
  • 最后,花费5秒淡出

你可能早已想到,我们不得不考虑三个不同的动画:

1
2
3
4
5
6
7
8
9
10
11
12
13
14
15
16
17
18
19
20
21
22
23
24
25
26
27
28
29
30
31
///
/// Definition of the _controller with a whole duration of 10 seconds
///
AnimationController _controller = new AnimationController(
duration: const Duration(seconds: 10),
vsync: this
);

///
/// First animation that moves the ball from the left to the center
///
Animation<Offset> moveLeftToCenter = new Tween(
begin: new Offset(0.0, screenHeight /2),
end: new Offset(screenWidth /2, screenHeight /2)
).animate(_controller);

///
/// Second animation that moves the ball from the center to the top
///
Animation<Offset> moveCenterToTop = new Tween(
begin: new Offset(screenWidth /2, screenHeight /2),
end: new Offset(screenWidth /2, 0.0)
).animate(_controller);

///
/// Third animation that will be used to change the opacity of the ball to make it disappear
///
Animation<double> disappear = new Tween(
begin: 1.0,
end: 0.0
).animate(_controller);

现在的问题是,如何链接(或编排)这些子动画呢?

间隔的概念

通过使用Interval类来解决,但是什么是interval呢?

与我们脑海中首先想到的相矛盾的是,这个是与时间间隔无关的,而是一个值的范围。

如果你想到_controller,你必须记住它使得值从下限到上限变化。

通常地,这两个值分别对应在lowerBound=0.0upperBound=1.0,这使得事情更容易考虑些,因为[0.0 -> 1.0]只不过是从0%到100%的变化。因此,如果一个场景的总持续时间是10秒,那么很有可能在5秒之后,对应的_controller.value将非常接近0.5(= 50%)。

如果我们把三个不同的动画放在一个时间线上:

如果我们为三个动画的每个考虑值的区间,得到如下:

  • moveLeftToCenter

    持续时间:2秒,开始在0秒,结束在2秒 => 范围 =[0;2] =>

    百分比:整个场景从0%到20% => [0.0;0.20]

  • moveCenterToTop

    持续时间:3秒,开始在2秒,结束在5秒 => 范围 =[2;5] =>

    百分比:整个场景从20%到50% => [0.20;0.50]

  • disapper

    持续时间:5秒,开始在5秒,结束在10秒 => 范围 = [5;10] =>
    百分比:整个场景从50%到100% => [0.50;1.0]

现在,我们有了这些百分比,我们可更新各个动画的定义如下:

1
2
3
4
5
6
7
8
9
10
11
12
13
14
15
16
17
18
19
20
21
22
23
24
25
26
27
28
29
30
31
32
33
34
35
36
37
38
39
40
41
42
43
44
45
46
47
48
49
50
51
52
53
54
55
56
///
/// Definition of the _controller with a whole duration of 10 seconds
///
AnimationController _controller = new AnimationController(
duration: const Duration(seconds: 10),
vsync: this
);

///
/// First animation that moves the ball from the left to the center
///
Animation<Offset> moveLeftToCenter = new Tween(
begin: new Offset(0.0, screenHeight /2),
end: new Offset(screenWidth /2, screenHeight /2)
).animate(
new CurvedAnimation(
parent: _controller,
curve: new Interval(
0.0,
0.20,
curve: Curves.linear,
),
),
);

///
/// Second animation that moves the ball from the center to the top
///
Animation<Offset> moveCenterToTop = new Tween(
begin: new Offset(screenWidth /2, screenHeight /2),
end: new Offset(screenWidth /2, 0.0)
).animate(
new CurvedAnimation(
parent: _controller,
curve: new Interval(
0.20,
0.50,
curve: Curves.linear,
),
),
);

///
/// Third animation that will be used to change the opacity of the ball to make it disappear
///
Animation<double> disappear = new Tween(begin: 1.0, end: 0.0)
.animate(
new CurvedAnimation(
parent: _controller,
curve: new Interval(
0.50,
1.0,
curve: Curves.linear,
),
),
);

这就是定义一个场景(或一系列动画)所需要的全部设置。当然,你也可以堆叠子动画。

响应动画状态

一个动画4个不同的状态:

  • dismissed: 在开始的时候动画停止(或还没开始)
  • forward: 动画从起点到终点播放
  • reverse: 动画反向播放,从终点向起点播放
  • completed:动画在终点结束

为了获取这个状态,我们需要监听动画的状态,如下:

1
2
3
4
5
6
7
8
9
10
11
12
13
14
15
16
17
18
19
myAnimation.addStatusListener((AnimationStatus status){
switch(status){
case AnimationStatus.dismissed:
...
break;

case AnimationStatus.forward:
...
break;

case AnimationStatus.reverse:
...
break;

case AnimationStatus.completed:
...
break;
}
});

典型用法就是状态切换。例如,一旦动画完成,我们想要反转,可以这样实现:

1
2
3
4
5
6
7
8
9
10
11
12
13
14
15
16
17
myAnimation.addStatusListener((AnimationStatus status){
switch(status){
///
/// When the animation is at the beginning, we force the animation to play
///
case AnimationStatus.dismissed:
_controller.forward();
break;

///
/// When the animation is at the end, we force the animation to reverse
///
case AnimationStatus.completed:
_controller.reverse();
break;
}
});

理论到此为止,让我们开始实践吧!(Enough theory, let’s practice now !)

现在理论已经介绍完了,是时候开始实践了…

动画分析及初始化骨架

为了有这个guillotine效果,我起初需要考虑的是:

  • 页面内容本身
  • 当我们点击菜单(或hamburger)图标的时候,菜单栏能够旋转
  • 当旋转进去的时候,菜单能够重叠页面的内容,填充整个视框
  • 一旦菜单完全展示出来,在我们再次点击的时候,菜单能够旋转进去,为了是能够回到原始的位置和大小

通过这些了解,我们立即得出这样的结论我们并没有使用带有AppBarScafflod。(因为AppBar是固定的)。

相反,我们使用了Stack,堆叠了两层:

  • 页面内容(下层)
  • 菜单(上层)

让我们构建这个骨架:

1
2
3
4
5
6
7
8
9
10
11
12
13
14
15
16
17
18
19
20
21
22
23
24
25
26
27
28
29
30
31
32
33
34
35
36
37
38
39
40
41
42
43
44
45
46
47
48
class MyPage extends StatefulWidget {
@override
_MyPageState createState() => new _MyPageState();
}

class _MyPageState extends State<MyPage>{
@override
Widget build(BuildContext context){
return SafeArea(
top: false,
bottom: false,
child: new Container(
child: new Stack(
alignment: Alignment.topLeft,
children: <Widget>[
new Page(),
new GuillotineMenu(),
],
),
),
);
}
}

class Page extends StatelessWidget {
@override
Widget build(BuildContext context){
return new Container(
padding: const EdgeInsets.only(top: 90.0),
color: Color(0xff222222),
);
}
}

class GuillotineMenu extends StatefulWidget {
@override
_GuillotineMenuState createState() => new _GuillotineMenuState();
}

class _GuillotineMenuState extends State<GuillotineMenu> {

@overrride
Widget build(BuildContext context){
return new Container(
color: Color(0xff333333),
);
}
}

这段代码的结果是一个黑屏,只显示了GuillotineMenu,覆盖了整个视图。
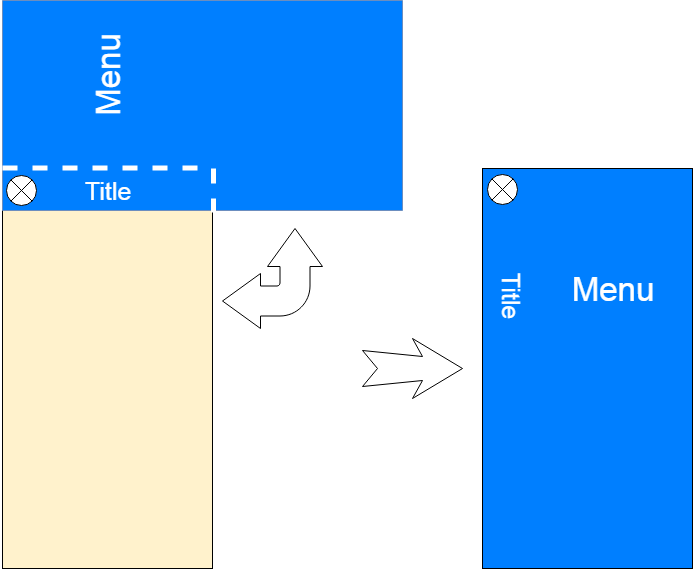
菜单分析

如果你仔细观看视频的话,你会看到,当菜单完全打开的时候,它是完全覆盖视框的,当打开的时候,仅有例如AppBar是可见的。

我们重写_GuillotineMenuState如下:

1
2
3
4
5
6
7
8
9
10
11
12
13
14
15
16
17
18
19
20
21
22
23
24
25
26
27
28
29
30
31
32
33
34
35
36
37
38
39
40
41
42
43
44
45
46
47
48
49
50
51
52
53
54
55
56
57
58
59
60
61
62
63
64
65
66
67
68
69
70
71
72
73
74
75
76
77
78
79
80
81
82
83
84
85
86
87
88
89
90
91
92
93
94
95
96
97
98
99
100
101
102
103
104
105
106
107
108
109
110
111
112
113
114
115
116
117
118
119
120
121
122
123
124
125
126
127
128
129
130
131
132
133
134
class _GuillotineMenuState extends State<GuillotineMenu> {
double rotationAngle = 0.0;

@override
Widget build(BuildContext context){
MediaQueryData mediaQueryData = MediaQuery.of(context);
double screenWidth = mediaQueryData.size.width;
double screenHeight = mediaQueryData.size.height;

return new Transform.rotate(
angle: rotationAngle,
origin: new Offset(24.0, 56.0),
alignment: Alignment.topLeft,
child: Material(
color: Colors.transparent,
child: Container(
width: screenWidth,
height: screenHeight,
color: Color(0xFF333333),
child: new Stack(
children: <Widget>[
_buildMenuTitle(),
_buildMenuIcon(),
_buildMenuContent(),
],
),
),
),
);
}

///
/// Menu Title
///
Widget _buildMenuTitle(){
return new Positioned(
top: 32.0,
left: 40.0,
width: screenWidth,
height: 24.0,
child: new Transform.rotate(
alignment: Alignment.topLeft,
origin: Offset.zero,
angle: pi / 2.0,
child: new Center(
child: new Container(
width: double.infinity,
height: double.infinity,
child: new Opacity(
opacity: 1.0,
child: new Text('ACTIVITY',
textAlign: TextAlign.center,
style: new TextStyle(
color: Colors.white,
fontSize: 20.0,
fontWeight: FontWeight.bold,
letterSpacing: 2.0,
)),
),
),
)),
);
}

///
/// Menu Icon
///
Widget _buildMenuIcon(){
return new Positioned(
top: 32.0,
left: 4.0,
child: new IconButton(
icon: const Icon(
Icons.menu,
color: Colors.white,
),
onPressed: (){},
),
);
}

///
/// Menu content
///
Widget _buildMenuContent(){
final List<Map> _menus = <Map>[
{
"icon": Icons.person,
"title": "profile",
"color": Colors.white,
},
{
"icon": Icons.view_agenda,
"title": "feed",
"color": Colors.white,
},
{
"icon": Icons.swap_calls,
"title": "activity",
"color": Colors.cyan,
},
{
"icon": Icons.settings,
"title": "settings",
"color": Colors.white,
},
];

return new Padding(
padding: const EdgeInsets.only(left: 64.0, top: 96.0),
child: new Container(
width: double.infinity,
height: double.infinity,
child: new Column(
mainAxisAlignment: MainAxisAlignment.start,
children: _menus.map((menuItem) {
return new ListTile(
leading: new Icon(
menuItem["icon"],
color: menuItem["color"],
),
title: new Text(
menuItem["title"],
style: new TextStyle(
color: menuItem["color"],
fontSize: 24.0),
),
);
}).toList(),
),
),
);
}
}
  • 第10-13行,定义了Guillotine Menu的旋转,以及旋转中心(菜单图标的位置)

此时这段代码的结果会显示出一个未旋转的菜单屏幕(因为rotationAngle = 0.0),标题垂直展示。

菜单动画

如果你更新了rotationAngle的值(-π/2 and 0),你将会看到菜单以相应的角度旋转。

来让我们添加写动画…

正如之前所讲的,我们需要:

  • 一个SingleTickerProviderStateMixin,因为仅有一个场景
  • 一个AnimationController
  • 一个Animation,角度变化

代码如下:

1
2
3
4
5
6
7
8
9
10
11
12
13
14
15
16
17
18
19
20
21
22
23
24
25
26
27
28
29
30
31
32
33
34
35
36
37
38
39
40
41
42
43
44
45
46
47
48
49
50
51
52
53
54
55
56
57
58
59
60
61
62
63
64
65
66
67
68
69
70
71
72
73
74
75
76
77
78
79
80
81
82
83
84
85
86
87
88
89
90
class _GuillotineMenuState extends State<GuillotineMenu>
with SingleTickerProviderStateMixin {

AnimationController animationControllerMenu;
Animation<double> animationMenu;

///
/// Menu Icon, onPress() handling
///
_handleMenuOpenClose(){
animationControllerMenu.forward();
}

@override
void initState(){
super.initState();

///
/// Initialization of the animation controller
///
animationControllerMenu = new AnimationController(
duration: const Duration(milliseconds: 1000),
vsync: this
)..addListener((){
setState((){});
});

///
/// Initialization of the menu appearance animation
///
_rotationAnimation = new Tween(
begin: -pi/2.0,
end: 0.0
).animate(animationControllerMenu);
}

@override
void dispose(){
animationControllerMenu.dispose();
super.dispose();
}

@override
Widget build(BuildContext context){
MediaQueryData mediaQueryData = MediaQuery.of(context);
double screenWidth = mediaQueryData.size.width;
double screenHeight = mediaQueryData.size.height;
double angle = animationMenu.value;

return new Transform.rotate(
angle: angle,
origin: new Offset(24.0, 56.0),
alignment: Alignment.topLeft,
child: Material(
color: Colors.transparent,
child: Container(
width: screenWidth,
height: screenHeight,
color: Color(0xFF333333),
child: new Stack(
children: <Widget>[
_buildMenuTitle(),
_buildMenuIcon(),
_buildMenuContent(),
],
),
),
),
);
}

...
///
/// Menu Icon
///
Widget _buildMenuIcon(){
return new Positioned(
top: 32.0,
left: 4.0,
child: new IconButton(
icon: const Icon(
Icons.menu,
color: Colors.white,
),
onPressed: _handleMenuOpenClose,
),
);
}
...
}

当我们按下这个菜单按钮的时候,菜单会打开,但当我们再次按下按钮时不会关闭。这里是AnimationStatus发挥的作用。

添加基于AnimationStatus的监听器,决定是否forwardreverse动画。

1
2
3
4
5
6
7
8
9
10
11
12
13
14
15
16
17
18
19
20
21
22
23
24
25
26
27
28
29
30
31
32
33
34
35
36
37
38
39
40
41
42
43
44
45
46
47
48
49
50
51
52
53
54
///
/// Menu animation status
///
enum _GuillotineAnimationStatus { closed, open, animating }

class _GuillotineMenuState extends State<GuillotineMenu>
with SingleTickerProviderStateMixin {
AnimationController animationControllerMenu;
Animation<double> animationMenu;
_GuillotineAnimationStatus menuAnimationStatus = _GuillotineAnimationStatus.closed;

_handleMenuOpenClose(){
if (menuAnimationStatus == _GuillotineAnimationStatus.closed){
animationControllerMenu.forward().orCancel;
} else if (menuAnimationStatus == _GuillotineAnimationStatus.open) {
animationControllerMenu.reverse().orCancel;
}
}

@override
void initState(){
super.initState();

///
/// Initialization of the animation controller
///
animationControllerMenu = new AnimationController(
duration: const Duration(milliseconds: 1000),
vsync: this
)..addListener((){
setState((){});
})..addStatusListener((AnimationStatus status) {
if (status == AnimationStatus.completed) {
///
/// When the animation is at the end, the menu is open
///
menuAnimationStatus = _GuillotineAnimationStatus.open;
} else if (status == AnimationStatus.dismissed) {
///
/// When the animation is at the beginning, the menu is closed
///
menuAnimationStatus = _GuillotineAnimationStatus.closed;
} else {
///
/// Otherwise the animation is running
///
menuAnimationStatus = _GuillotineAnimationStatus.animating;
}
});

...
}
...
}

此时,这个菜单已经按照预期打开或关闭,但是视频中展示的打开/关闭动作不是线性的,看起来似乎有一个反弹效果,让我们添加上这个效果。

选择下面这两个效果:

  • bounceOut,菜单打开
  • bounceIn,菜单关闭
1
2
3
4
5
6
7
8
9
10
11
12
13
14
15
16
17
18
19
20
class _GuillotineMenuState extends State<GuillotineMenu>
with SingleTickerProviderStateMixin {
...
@override
void initState(){
...
///
/// Initialization of the menu appearance animation
///
animationMenu = new Tween(
begin: -pi / 2.0,
end: 0.0
).animate(new CurvedAnimation(
parent: animationControllerMenu,
curve: Curves.bounceOut,
reverseCurve: Curves.bounceIn,
));
}
...
}

在这个实现中仍然有一些遗漏的东西……事实上,标题在打开菜单时消失,在关闭菜单时重新出现,这是一个fadeIn/fadeOut的效果,同样也要被处理成动画。

1
2
3
4
5
6
7
8
9
10
11
12
13
14
15
16
17
18
19
20
21
22
23
24
25
26
27
28
29
30
31
32
33
34
35
36
37
38
39
40
41
42
43
44
45
46
47
48
49
50
51
52
53
54
55
56
57
58
59
60
61
class _GuillotineMenuState extends State<GuillotineMenu>
with SingleTickerProviderStateMixin {
AnimationController animationControllerMenu;
Animation<double> animationMenu;
Animation<double> animationTitleFadeInOut;
_GuillotineAnimationStatus menuAnimationStatus;

...
@override
void initState(){
...
///
/// Initialization of the menu title fade out/in animation
///
animationTitleFadeInOut = new Tween(
begin: 1.0,
end: 0.0
).animate(new CurvedAnimation(
parent: animationControllerMenu,
curve: new Interval(
0.0,
0.5,
curve: Curves.ease,
),
));
}
...
///
/// Menu Title
///
Widget _buildMenuTitle(){
return new Positioned(
top: 32.0,
left: 40.0,
width: screenWidth,
height: 24.0,
child: new Transform.rotate(
alignment: Alignment.topLeft,
origin: Offset.zero,
angle: pi / 2.0,
child: new Center(
child: new Container(
width: double.infinity,
height: double.infinity,
child: new Opacity(
opacity: animationTitleFadeInOut.value,
child: new Text('ACTIVITY',
textAlign: TextAlign.center,
style: new TextStyle(
color: Colors.white,
fontSize: 20.0,
fontWeight: FontWeight.bold,
letterSpacing: 2.0,
)),
),
),
)),
);
}
...
}

源码

这篇文章的完成源码在GitHub